Introduction to WebAssembly for .NET Developers: Building with Uno Platform, XAML, and C#
This post will be more practical. I’ll show you how to build a web application utilising WebAssembly with .NET, XAML, and C#. You’ll build a simple XAML app with some form controls to collect data and display that data in a ListView. Here’s how the app you will build will look like:

At the end you’ll learn:
- How to create a WebAssembly .NET project.
- How to deploy the app.
- Set up your computer for WebAssembly app development with .NET Core and Uno platform.
In order to easily follow along, you need to have some knowledge of C# and either XAML, Windows Forms, or WebForms, but I’ll be chiming in with some context so that even if you’ve never worked with XAML, you can easily follow along.
Project Set-Up
You can build Uno platform apps for WebAssembly, Windows, Linux, macOS, and the different mobile OS. The setup is different for each platform but I’ll detail the steps for creating an Uno project using both Visual Studio and VS Code. You’ll need .NET Core SDK installed, so download and install the latest version of the .NET Core 3.1 SDK. At the time of this publication, it’s version 3.1.402.
Using Visual Studio
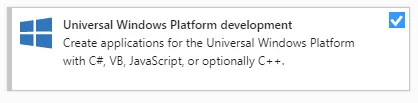
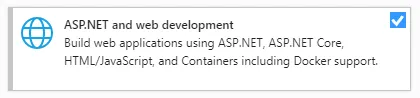
If you want to use Visual Studio IDE, you should download and install Visual Studio 2019 version 16.3 or later and make sure to select Universal Windows Platform and ASP.NET and web development workload when installing.
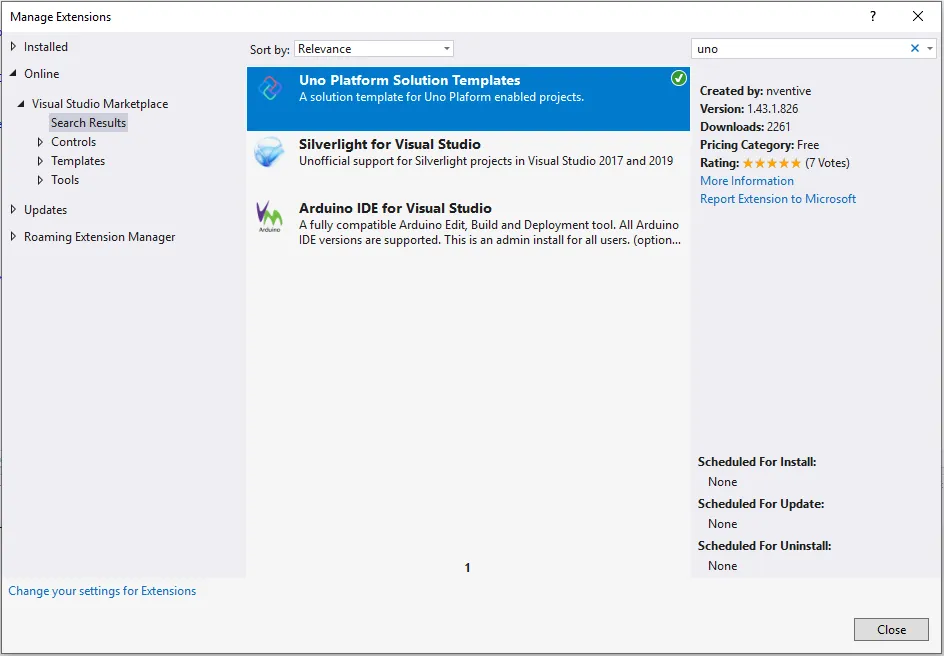
Install Uno platform solution templates from the Visual Studio marketplace. You can download and install the template through Visual Studio. Open Visual Studio and go to Extension Manager, then expand the Online node and search for Uno Platform. Select and Install the Uno Platform Solution Templates extension.
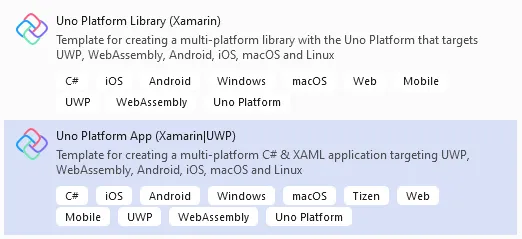
Next, create a new C# solution using the Cross-Platform App (Uno Platform) template, from Visual Studio’s Start Page.
Using VS Code
If you’re on a Mac or Linux computer, you can use VS Code. You should download and install VS Code, and after that download and install mono runtime. Then install the Uno platform solution template using the dotnet CLI by running dotnet new -i Uno.ProjectTemplates.Dotnet from the command line.
Now you can create a project using the template you installed by running dotnet new unoapp -o MyWasmApp -ios=false -android=false -macos=false -uwp=false --vscodeWasm. You can open the solution on VS Code by running code ./MyWasmApp. VS Code will ask you to restore the nuget packages, click yes to install the nuget dependencies.
Adding Controls to the Page
Now that we have the Uno project created, we can add controls to the page and wire up events. Open MyWasmApp.Wasm/MainPage.xaml and replace the
<RelativePanel>
    <StackPanel x:Name="Customer" Margin="20">
        <TextBox x:Name="Name" Header= "Customer Name" Margin="0,24,0,0" Width="500" HorizontalAlignment="Left" />
        <TextBox x:Name="Address" Header="Address" PlaceholderText="Address" Width="500" Margin="0,24,0,0" HorizontalAlignment="Left" />
    </StackPanel>
    <StackPanel x:Name="Save" Orientation="Horizontal" RelativePanel.Below="Customer">
        <Button Click="SaveButton_Click" Content="Save" Margin="24" />
    </StackPanel>
</RelativePanel>

<ListView ItemsSource="{x:Bind Customers}" HorizontalAlignment="Center" VerticalAlignment="Center">
    <ListView.ItemTemplate>
        <DataTemplate x:DataType="local:Customer">
            <Grid>
                <StackPanel x:Name="Customer" Margin="5">
                    <TextBlock Text="{x:Bind Name, Mode=OneWay}" TextWrapping="NoWrap"/>
                    <TextBlock Text="{x:Bind Address, Mode=OneWay}" TextWrapping="NoWrap"/>
                </StackPanel>
            </Grid>
        </DataTemplate>
    </ListView.ItemTemplate>
</ListView>
The markup you just added will render a form with inputs to collect name and address, and then display that data using the ListView control. The Button is bound to a method called SaveButton_Click and the ListView is bound to a collection of Customer objects, therefore we need to create this class and method.
Add a new file Customer.cs and paste the below class declaration in it:
public class Customer
{
    public string Name { get; set; }
    public string Address { get; set; }
}
Next, add the event handler method for the button. Open MyWasmApp.Wasm/MainPage.xaml.cs and add this method to the class.
private void SaveButton_Click(object sender, RoutedEventArgs e)
{
    this.Customers.Add(new Customer() { Name = Name.Text, Address = Address.Text });
    Name.Text = "";
    Address.Text = "";
}
This method reads the value from the Name and Address input controls, then adds a new Customer object to the Customers collection.
Add the declaration for the Customers variable to the class.
public ObservableCollection<Customer> Customers { get; } = new ObservableCollection<Customer>();We would like to add some data to the Customers collection when the app loads. TO achieve this, add the following statements to the MainPage() constructor:
this.Customers.Add(new Customer() { Name = "James Rodriguez", Address = "12, Kelheimer Str." });
this.Customers.Add(new Customer() { Name = "Filipe Nzazi", Address = "32, Landsberger Str." });
Since we’re using ObservableCollection, we need to reference the appropriate namespace. Add the following using statement at the top of the file.
using System.Collections.ObjectModel;Running The Application
Now you have a basic application ready. In order to run it on Visual Studio, make sure the WebAssembly project is selected as the startup project, then IIS Express, and choose Start without debugging (or press **Ctrl + F5 **). For more information on debugging the application using Visual Studio, check the Uno platform documentation.
If you’re using VS Code, debugging the application is a two-step process and it requires the JavaScript Debugger extension. If you’re using VS Code versions after 1.46.0 then this extension is installed by default, however, you’d need to enable it. You can enable it by adding “debug.javascript.usePreview”: true to your user settings.
To debug the app, first of all, start the app using the ”.NET Core Launch (Uno Platform App)” launch configuration.
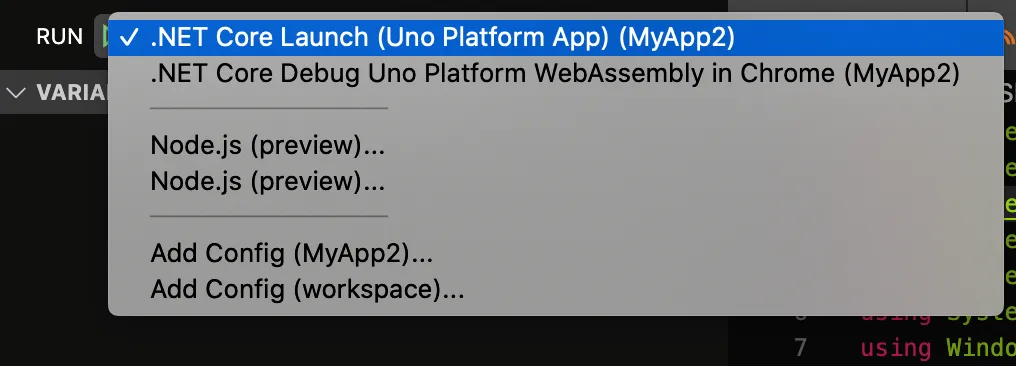
Then after the application has started, start the browser using the ”.NET Core Debug Uno Platform WebAssembly in Chrome” launch configuration.

Deploy the Application
The last thing I’d like to cover will be how to build and publish the application. The easiest way to publish the build results is to use the Visual Studio publish menu on your project. This will allow using all the features provided by the standard experience, as described in the Deploy to Azure App Service.
If you’re using VS Code, you can run the publish task from VS Code and copy files in the bin/Debug/netstandard2.0/publish directory to wherever you want to host it. In order to run the publish task, you can press Command + Shift + P on mac and select Run Task. Then select publish and press Enter. After the build is done you can copy the folder and publish it. I use Netlify to host my application so for me it was a simple process of dragging and dropping a folder on the Netlify console. You don’t have to copy all the files in the publish directory. You can copy the inxex.html, the package_[Randon_Number] folder, and service-worker.js file into an empty folder and upload it.
Here’s the URL (url no longer available) of my deployment if you want to check it out.
Conclusion
By now I hope you have a good understanding of WebAssembly and how to build WebAssembly apps using C#. In this post, I showed you how to set up your environment for developing WebAssembly apps with Uno. We went from installing the dotnet project templates, creating the project using the installed template, and then deploying the app. In an upcoming post, I’ll show you how you can set up continuous integration on GitHub so your app is automatically deployed when you push changes to your Git repository.
Stay tuned for more awesome content 🚀