How to Add SSO to a Next.js App Using Clerk
Single sign-on (SSO) is an authentication scheme that enables users to authenticate with multiple applications using just one set of credentials (e.g., email and password). You may be familiar with SSO if you use Google services like Docs, Sheets, Drive, etc. You log in to Google Docs and when you visit Drive or Sheets, you’re automatically logged in.
How Does This Work?
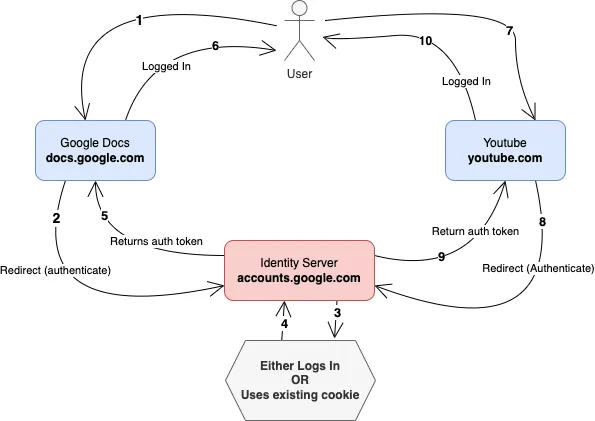
SSO is achieved by having a central _identity/authentication _ server through which authentication is performed, then the session is shared with other domains/services without repeatedly asking for login credentials. Each service/domain will get a separate token or cookie when the users are authenticated. Users won’t need to re-enter their login credentials as long as there’s an authenticated session to the identity server.
SSO For Next.js Application Using Clerk
You can use protocols like OpenID Connect, OAuth and SAML for the SSO flow. In this tutorial, we’re going to implement SSO using Clerk, and use GitHub as the OAuth server that’ll authenticate users to the application.
“Why Clerk?” you may ask. Clerk is an authentication-as-a-service provider that provides easy-to-use components and API for user authentication and management. It comes with SDKs and UI components that you can easily integrate into your applications, and implementing SSO using the OAuth flow is a straightforward process.
We are going to build a basic Next.js application as an example, but the knowledge can be transferred to large Next.js applications.
Setting Up a Clerk Application
Let’s begin by creating a Clerk application. A Clerk app is a way to isolate the data and configuration for your specific application/service.
To create the application, go to the Clerk Dashboard and click on the Add application card. You’ll be presented with a subset of the available authentication options (you can change them later):
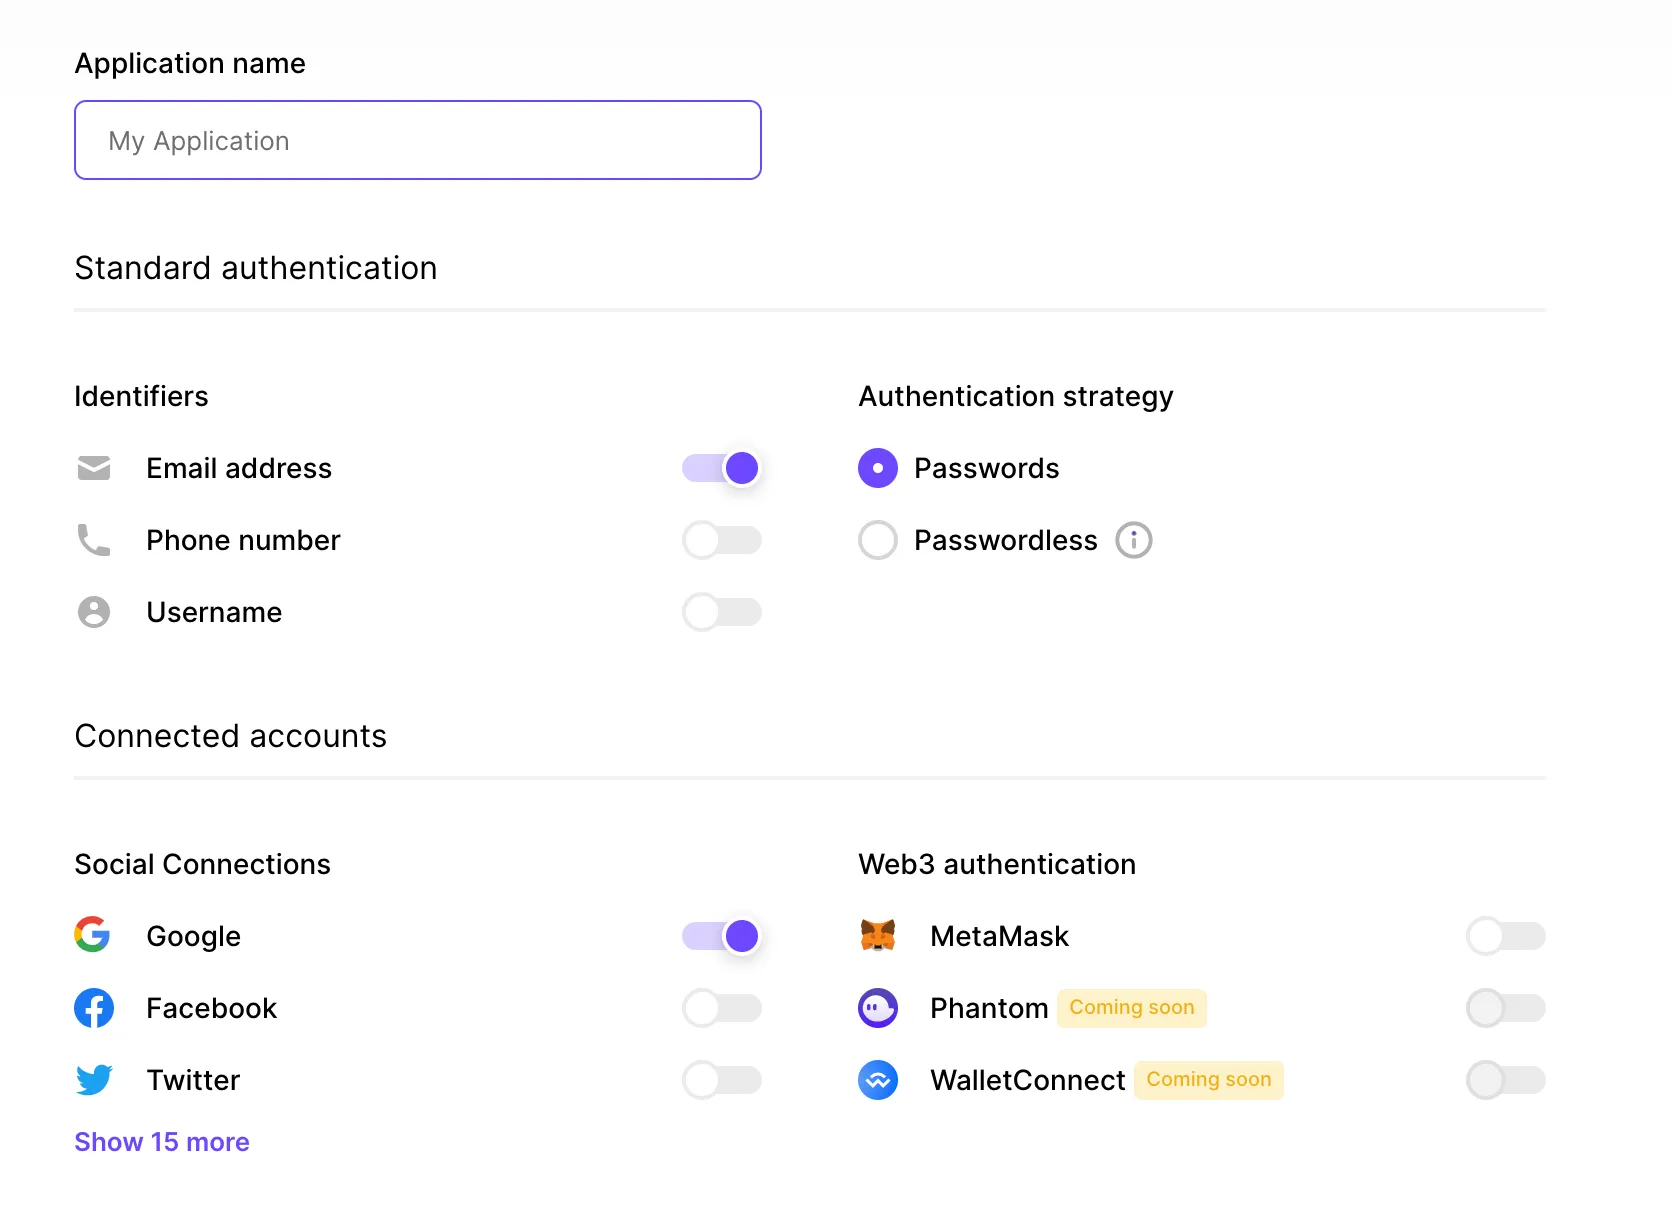
Enter your application name and click the Show more button in the Social Connections section in order to see the other available SSO providers.
Unselect Google and select GitHub, then click the Finish button at the bottom of the page. The application is created and you’re taken to its homepage.
At the top of the page, you should see a menu that reads “Instance”, which can be used to switch between the development and production environment for the application. We’ll work on the development environment.
The next step is to connect Clerk with GitHub as an OAuth application. Clerk uses a pre-configured shared OAuth credential and redirect URI in development mode, but that’s optional. You’ll have to add the OAuth credential and redirect URI in the production environment when you need to use it. You’re going to use the development environment for this tutorial, but you’ll use your own GitHub OAuth credential.
Create a GitHub OAuth App
You can create and register a GitHub OAuth app under your personal account or under any organization you have administrative access to. Follow these instructions to create an OAuth app.
- In the upper-right corner of any GitHub page, click your profile photo, then click Settings.
- In the left sidebar, click <> Developer settings.
- In the left sidebar, click OAuth Apps.
- Click the New OAuth App button (or the Register a new application button).
- Enter a name for your app in the Application name input box.
- Type the full URL to your app’s website in the Homepage URL input box.
- Enter a random URL as the Authorization callback URL. You will update this later with the URL you’ll get from your Clerk dashboard later.
- Click the Register application button to complete the process.
You will be redirected to the general information page for your OAuth app. Copy the Client ID for later use. You also need a client secret. Click the Generate a new client secret button to generate one.

Copy the secret to a text editor so that you can find it when you need it in the coming sections.
Configure a GitHub Connection on Clerk
Now that you have your GitHub OAuth app’s Client ID and Secret, we can configure Clerk to use those credentials for authentication. To do that, go to the Clerk dashboard and follow these instructions:
- Navigate to the User & Authentication page from the sidebar.
- Click Social Connections.
- Scroll down until you find GitHub, then click the settings icon. Configure-GitHub
- A modal should appear with some configuration options. Toggle on the Use custom credentials option and enter your OAuth client credentials.
- A form will be displayed with fields for Client ID and Secret. Copy and paste your OAuth app’s Client ID and Client Secret to the respective fields.
- Copy the URL in the Authorized redirect URI field because you need to update the callback URL on your GitHub OAuth app’s settings. Authorized-redirect-URI
- Click the Save button to save the changes.
The changes are saved and you can use your GitHub OAuth app for authentication. The last bit is to update the Authorization callback URL on GitHub. To do this, open the GitHub OAuth app’s tab from the previous section. Scroll down to the input field for Authorization callback URL.

Copy and paste the Authorized redirect URI you copied when configuring GitHub’s connection on Clerk and click Save to save the changes.
Integrate Clerk with Next.js
We’re going to integrate Clerk with Next.js in this section. The focus is on the SSO flow and how to use a few of the UI components provided by Clerk.
Open your terminal and create a new Next.js app using the command npx create-next-app@latest clerk-nextjs --use-npm --js --eslint. This should create a new Next.js 13 application.
Once the application is ready, you need to install Clerk’s Next.js SDK. This gives you access to Clerk’s React components, hooks, and helpers for API routes, server-side rendering and edge middleware. Run the command cd clerk-nextjs && npm install @clerk/nextjs to install the SDK.
Set Environment Variables
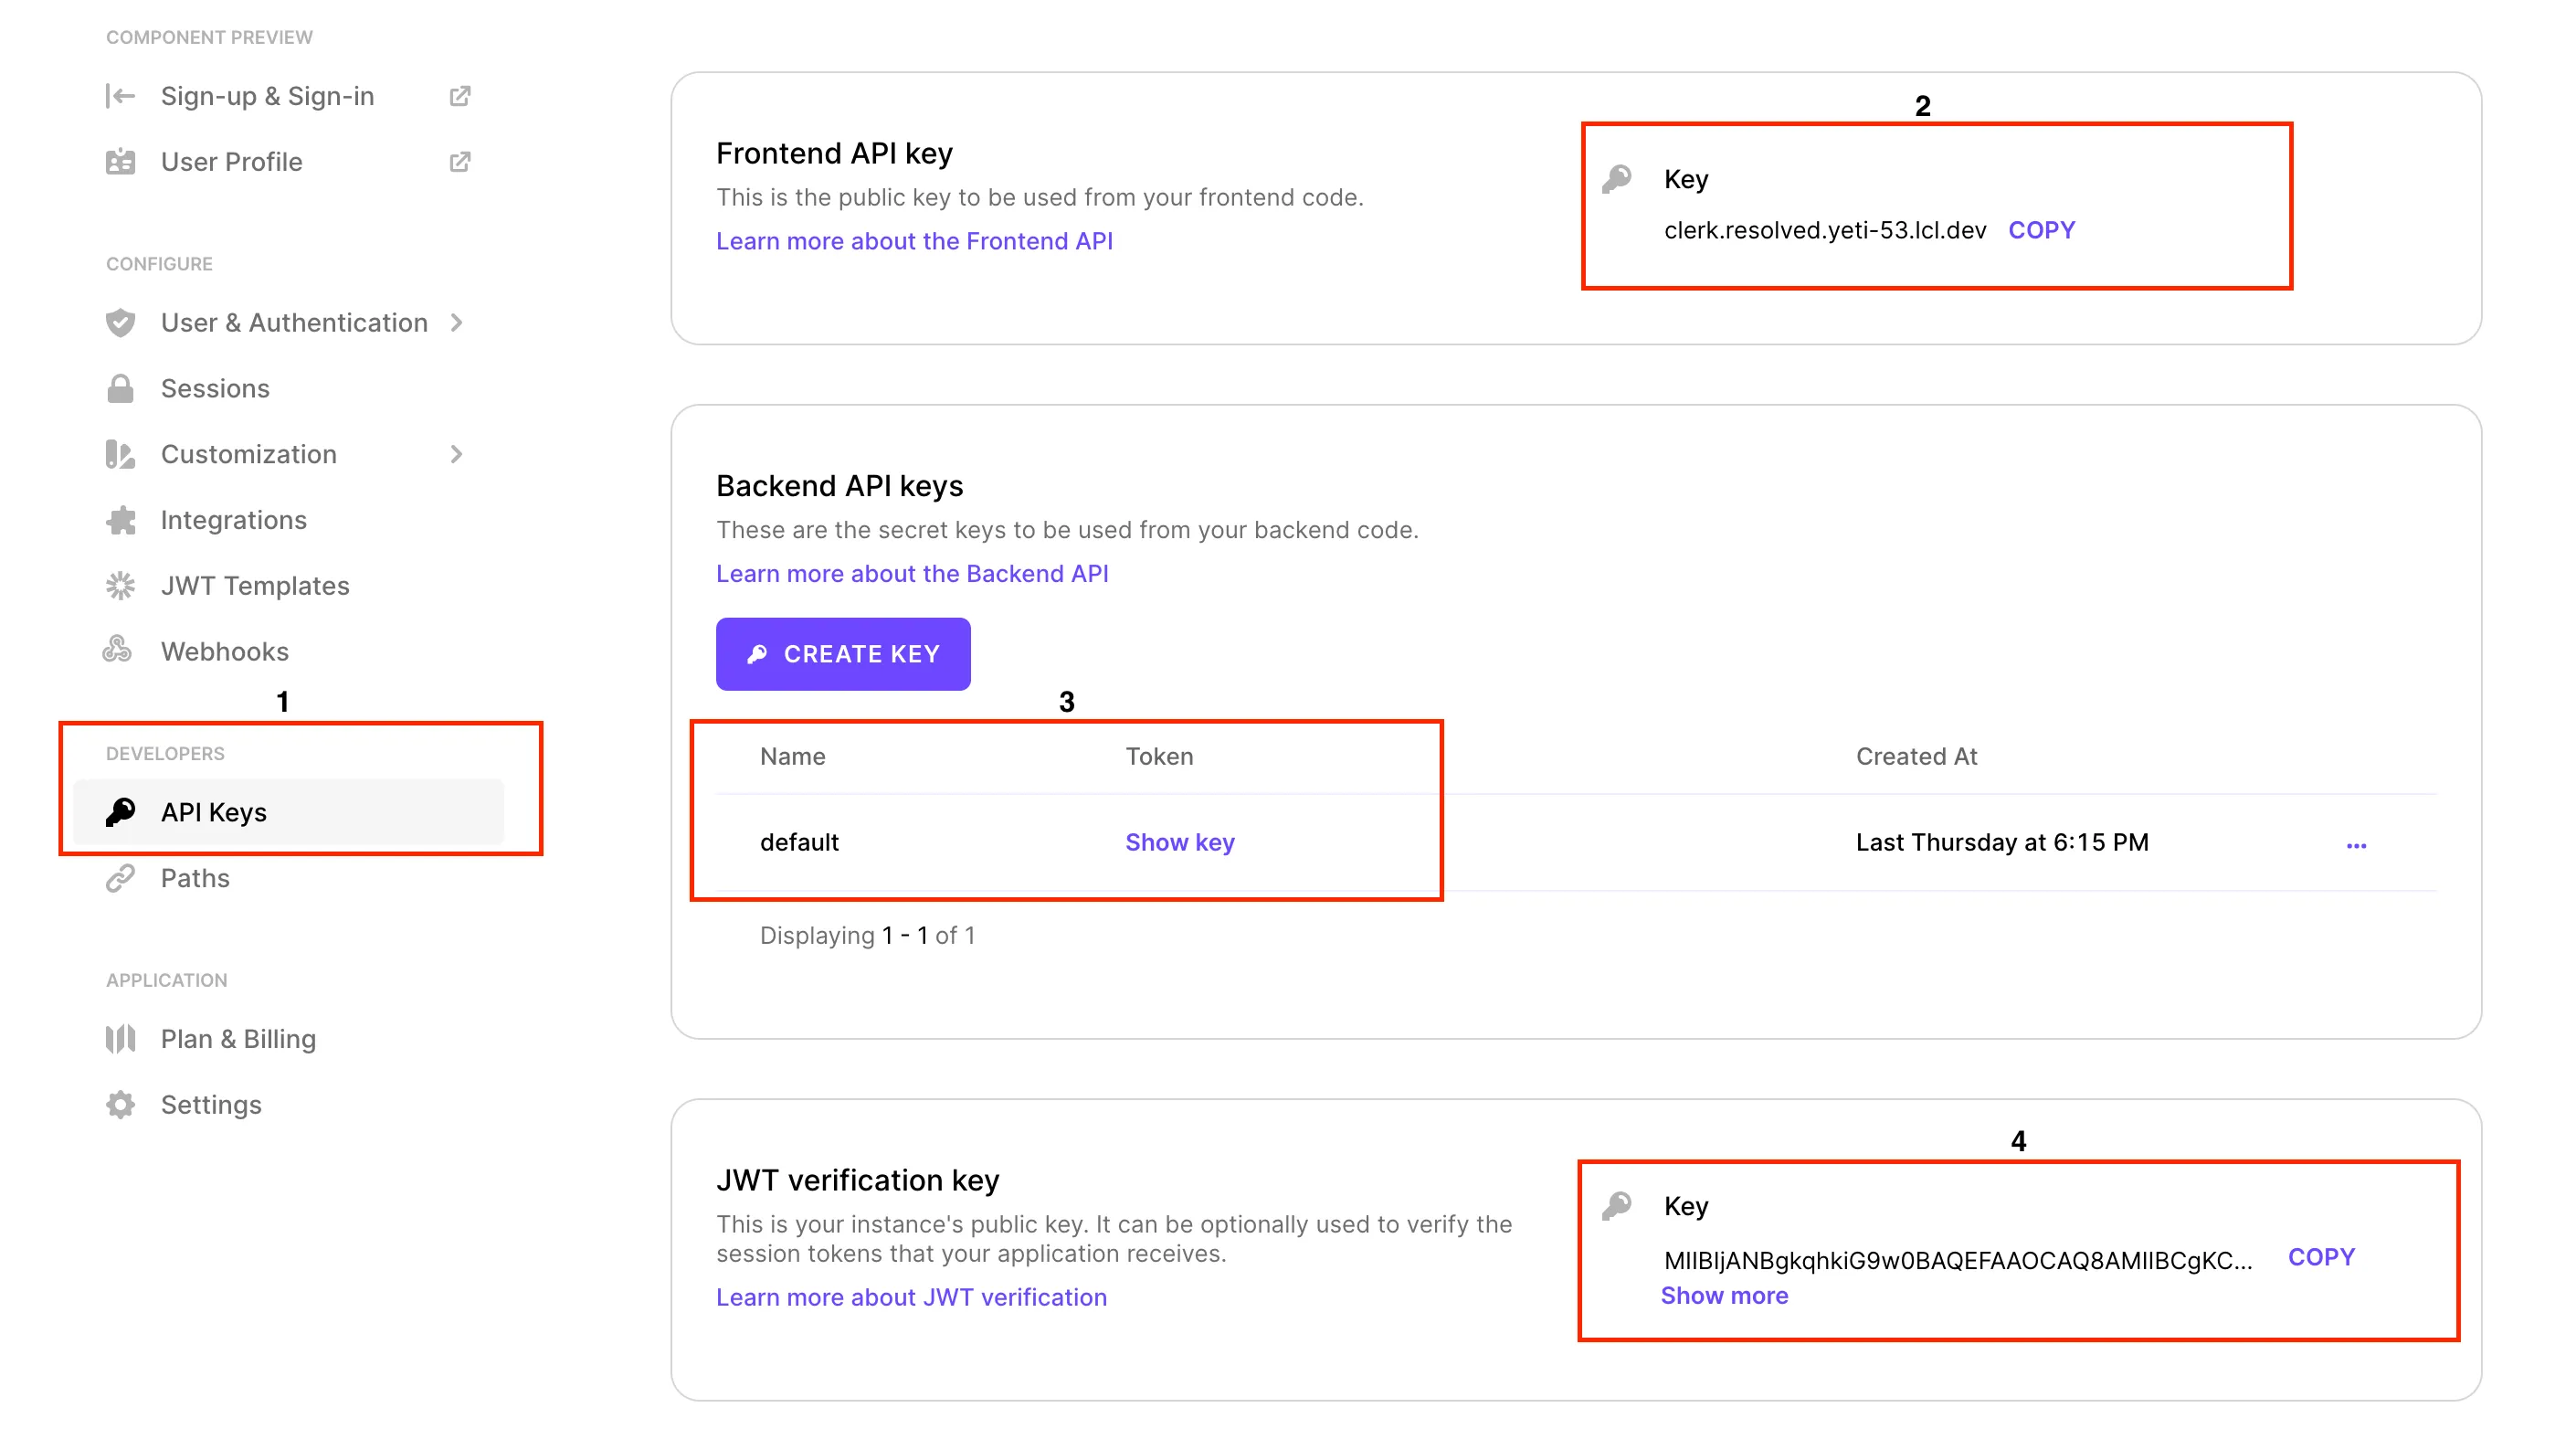
The next step is to add environment variables that will be used by the SDK. To do that, add a new file named env.local to the project. Then add the environment variables below to the file.
NEXT_PUBLIC_CLERK_FRONTEND_API=clerk.resolved.yeti-53.lcl.dev
CLERK_API_KEY=test_XXXXXXXX
CLERK_JWT_KEY=XXXXXXXXXX
To get the respective secrets, go to the API Keys page in the Clerk dashboard. You’ll find different sections for the varying secrets. Copy them and update the values in env.local.
Now that you have the environment variables, the next step is to add the <ClerkProvider /> component to the root of the application.
Configure
The <ClerkProvider /> component is used to provide Clerk’s session and user context information to your application. You can access these data via hooks or components provided by the SDK.
Let’s configure the application <ClerkProvider />.
Open the pages/_app.js file. Add the following import statement.
import { ClerkProvider } from "@clerk/nextjs";Then replace the return statement in the component with the following:
return (
  <ClerkProvider {...pageProps}>
    <Component {...pageProps} />
  </ClerkProvider>
);
The content of the file should be similar to the code snippet below:
import { ClerkProvider } from "@clerk/nextjs";

import "../styles/globals.css";

function MyApp({ Component, pageProps }) {
  return (
    <ClerkProvider {...pageProps}>
      <Component {...pageProps} />
    </ClerkProvider>
  );
}

export default MyApp;
If you use the new app layout in Next 13, you can do something similar to the following:
import React from "react"
import { ClerkProvider } from "@clerk/nextjs/app-beta";

export default function RootLayout({ children }: { children: React.ReactNode }) {
  return (
    <ClerkProvider>
      <html lang="en">
        <head>
          <title>Next.js 13 with Clerk</title>
        </head>
        <body>{children}</body>
      </html>
    </ClerkProvider>
  );
}
Authenticating Users
Now we get to the interesting part, authenticating users. 😎 We’re going to use some of the UI components provided by the @clerk/nextjs package. You can style them however you want, but for the sake of this tutorial, we will use the default style.
You’re not limited to using the provided components. You can also build your own UI components and use the hooks provided in the SDK. You can read more about using hooks in the SDK reference documentation.
Let’s get started with authenticating users. 👩🏽💻🔐
We’re going to add a button to the homepage, which will display a sign-in modal when it’s clicked. After the user has signed in, the page will display the grid content which will be hidden for unauthenticated users.
To achieve this, open the pages/index.js file and add this import statement:
import {
  SignedIn,
  SignedOut,
  SignInButton,
  SignOutButton,
} from "@clerk/nextjs";
After line 24, add the JSX below:
<SignedOut>
  <SignInButton mode="modal"></SignInButton>
</SignedOut>
The <SignedOut /> component will render its children if the user is not signed in. In this scenario, we show the <SignInButton /> which will display a sign-in modal to the user.
We want to show the items in the grid when the user is signed in. For that, wrap the <div /> on lines 29 to 59 with the <SignedIn /> component:
<SignedIn>
<SignOutButton /></SignOutButton>
<div className={styles.grid}>
<a href="https://nextjs.org/docs" className={styles.card}>
<h2>Documentation →</h2>
<p>Find in-depth information about Next.js features and API.</p>
</a>
// ... the rest of the div continues
</div>
</SignedIn>That’s all we need for the application. You can try out the application by running npm run dev, open localhost:300 in your browser and try the app.
That’s a Wrap
Wow! Isn’t that a very straightforward approach to getting authentication to work with your app? You don’t have to worry about cookies or how to use next-auth library. Clerk gives you everything you need out of the box.
We used the UI components in this tutorial but you can do the same with your custom UI components and the React hooks from the Clerk SDK. You can read more about using hooks in the SDK reference documentation.
You can find the completed code on GitHub if you want to clone and run the app yourself.
Originally posted on Telerik blog